Google Shopping Unleashed: A Step-by-Step Setup Guide
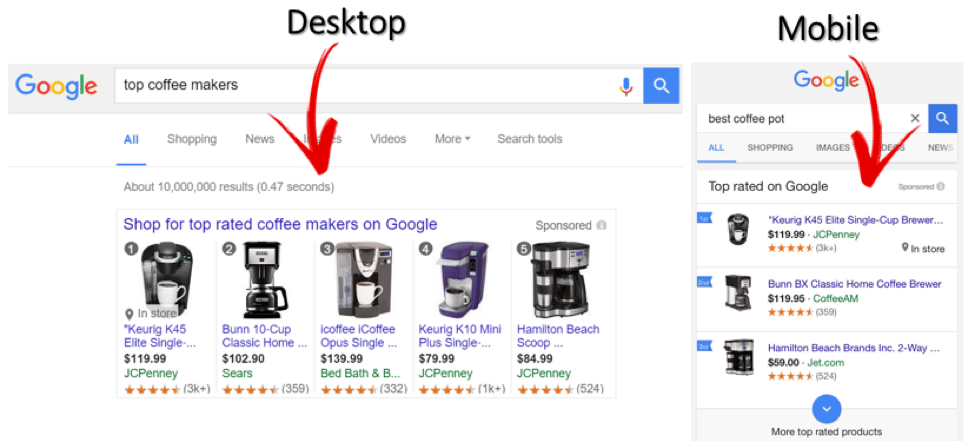
Google Shopping serves as a facilitator that successfully connects sellers and buyers.
This service enables online retailers to display not only their company’s ads or product promotions in search results, but also a mini product card that features a clickable link leading directly to its respective page on the website.
The present-day format of Google Shopping was established in 2012 after the initial launch of the service ten years prior. Google Shopping’s popularity among advertisers is persistently scaling upward, as evidenced by continuous studies:
- Between 2016 and 2017, Google Shopping’s advertising share experienced a significant increase, leaping from 25% to 34% (SIDECAR).
- In November 2018, the spending of advertisers on Google Shopping saw a 17% rise compared to the same timeframe in 2017 (SIDECAR).
- Google Shopping amassed an impressive 76.4% of retail advertising expenditure in 2018, while shopping campaigns were responsible for 85.3% of all paid clicks (Adthena).
As the wave of Google Shopping continues to swell, it’s the right time to grasp how to configure the service and exploit all the advantages it offers.
3 Steps for Setting up Google Shopping
The prerequisites for leveraging Google Shopping are:
- Initiating your registration in Google Merchant Center and integrating it with Google Ads
- Generation and uploading of a product feed to Google Merchant Center
- Establishing a shopping campaign via Google Ads
Before proceeding with the entire setup, it is imperative that your online store complies with these requirements:
- Operates on an HTTPS protocol
- Sells items that are in compliance with Google’s regulations. More details about restricted content can be found at this link
- Always maintains an inventory of the items it sells
- Features a fully operational shopping cart on its website with online payment options
- Discloses contact details on the website and provides comprehensive information about product exchanges and return policies on a dedicated page.
Upon confidently verifying each of these requirements, you can seamlessly move forward with the setup of your Google Shopping platform.
1) Registering in Google Merchant Center and linking the account to Google Ads
For retail enterprises, Google Merchant Center (GMC) is an invaluable tool. It allows you to efficiently manage ads for each item in your web store on Google, bypassing hefty expenses.
If you’re venturing into the Google Merchant Center for the initial time, you will be required to deliver essential details about your store (store location, name, website URL, and contact details) at the time of registration.
It is crucial to note that for the store’s name, the legal name should not be used. Preferably, the ‘popular’ or known name amongst customers should be filled in (since this is the one to be displayed in the advertisements). For instance, if you are legally known as Ivanov LLC, but your online store’s heading reads “Everything for the Home,” the store field should be filled in as “Everything for the Home.”
Before you kickstart the set-up process, ensure that you’ve paired your GMC and Google Ads accounts.

You’ll have to input your Google Ads Client ID, which can easily be copied from your account settings.

You can double-check this connection in Google Ads by navigating to the ‘Linked Accounts’ tab.

The entire procedure shouldn’t demand more than a few minutes of your time. After its completion, you should be ready to construct a feed.
2) Creating and Uploading Feeds in Google Merchant Center
A product feed is essentially a file encompassing data about the items available on your website. It can be either a text-based document (TXT) or a spreadsheet format (XML).
The specific characteristics of the product are outlined within the product feed through the use of attributes, certain ones are compulsory including:
- id – a singular product identifier.
- title
- description
- link – the URL to the product.
- image link – the URL encompassing the primary image of the product.
- availability
- price
Every attribute accompanies a set of compulsory guidelines. For instance, the “Title” attribute must not surpass 150 characters in length, and the description of the product shouldn’t exhibit any promotional content while the image scale cannot cross 64 megapixels. Before formulating a feed, it’s crucial to examine the attribute requirements outlined by Google support: https://support.google.com/merchants/answer/7052112?visit_id=636835264965210196-1496583724&rd=1.
By using this link, you will also come across a record of optional attributes alongside compulsory ones for specific product categories.
This facilitates decreasing the price of a click and aides in obtaining a favorable ranking position in the search results.
Understand, the efficiency of an advertising campaign heavily depends on the comprehensiveness of the product feed. Paying attention to supplementary attributes (even the ones that may seem unimportant initially), can significantly reduce click charges while enhancing your position in the Search Engine Results Page (SERP).
So, how does one build a feed?
There exists several methods to create a product feed:
- Generate a personalized feed using a given sample which can be downloaded here in either TXT or XLS format.
- Contract a programmer who could construct a feed from the site in XML format.
- Manually formulate a feed using Google Sheets. This approach is particularly beneficial for businesses with a smaller product range. It eradicates programmer-fee while offering automated data synchronization in the Merchant Center.
- Utilize feed for Yandex Market (if formulated previously). This can be converted within the Merchant Center settings. Note: only a minimal number of attributes will be taken into consideration using this method.
Upon inputting and authenticating all relevant data, the feed can be uploaded to GMC (Google Merchant Center). Commence by visiting the “Products” tab, proceed to “Feeds” and add a fresh one.

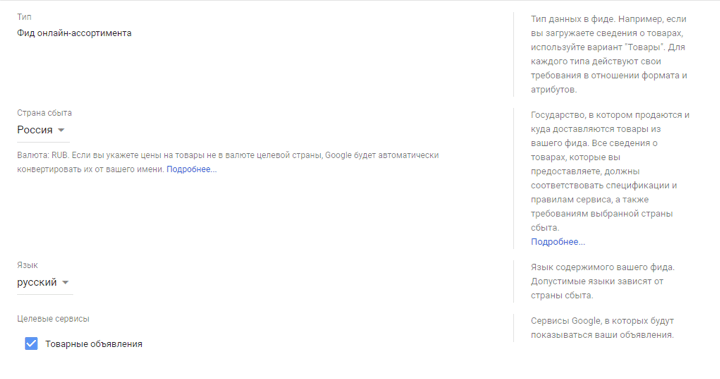
While configuring initially, provide the country of sale and language, then select the checkbox adjacent to “Shopping ads”, implying the display of advertisments in shopping campaigns.
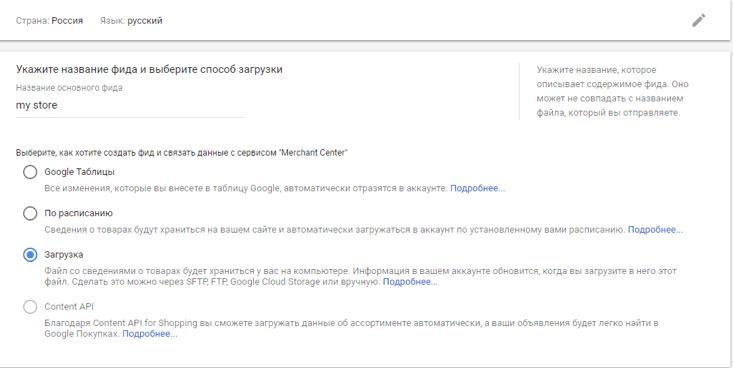
In the next step, choose the mode of feed upload. Opt for “Download” if the feed was created and saved onto your computer by a programmer or self-made using a template. For those who utilized Google Sheets for feed creation, the “Google Sheets” option is apt.
The feed’s file size limit is 4 GB. If you’re uploading archives in any of the compatible GZ, ZIP, BZ2 formats, the original file’s size is also not allowed to surpass 4 GB.
Under “Diagnostics”, you can view an elaborative report on accepted and rejected products. The longest duration for moderation is three days.
Upon successful upload of all products, you can move forward to configuring a shopping campaign.
3) Setting up Shopping Campaigns in Google Ads
Begin by setting up a Google Ads account, then move onto initiating a new campaign. This would involve picking your Sales objectives and specifying the type of product.
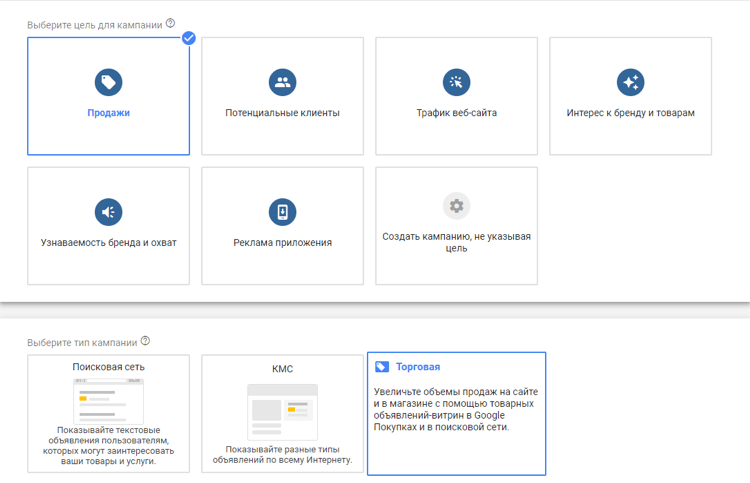
Once you hit the “Proceed” button, you’ll find two more sections appearing. Within the first one, it’s required for you to pinpoint the region of sales for your item and provide your GMC account info. This should automatically pop up given that we have already linked both the accounts earlier. The succeeding section compels you to define the campaign’s subtype. A basic Shopping Campaign unveils every single feature of Google Shopping as decided by your previous instructions. On the other hand, Smart Campaigns amalgamate the might of a shopping campaign and remarketing within Google Display Networks. Note that for this to work, you’d also have to tailor conversions and incorporate a remarketing tag on your website.
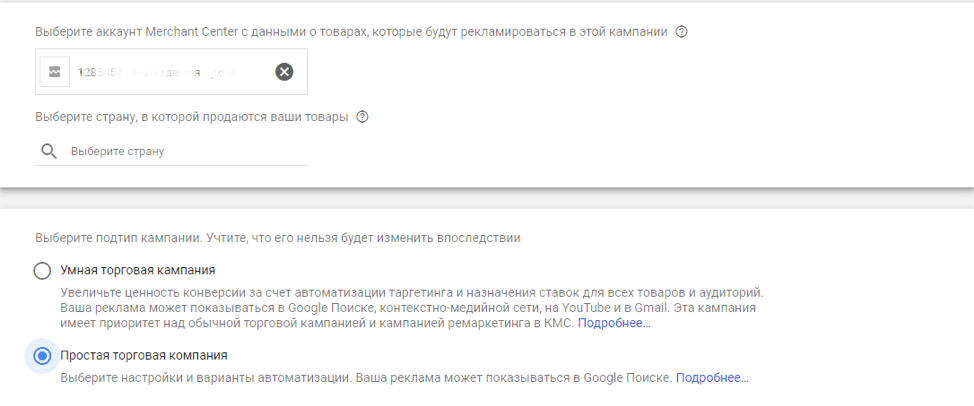
Afterwards, navigate to the primary settings for your newly formed campaign:
- Invent a suitable name.
- Decide upon a bidding strategy and establish a daily budget.
- Determine the region for your ads to be displayed.
Take a moment to carefully scan through the available priority options. This specific setting turns out to be relevant when you possess more than a single shopping campaign featuring identical products.

Next up, form a brand-new ad group, denoting its name and cost per click. There’s no requirement to construct separate ads since these will be produced automatically.
Main Benefits of Google Shopping
Google Shopping is primarily advantageous for well-established online stores as it instantly offers key product details to internet users on their search queries, thereby expediting their purchase decision.
Here’s why you should consider Google Shopping:
- It offers a lower cost-per-click compared to search campaigns.
- It’s a time-saver, as it eliminates the need to manually create ads for each product.
- It’s shopping ads format is more sales-effective than traditional ad copies.
It’s important to be aware that Google has specific criteria for advertising relevance and the quality of online stores. Not meeting these standards might result in a suspension from the Google Merchant Center.
To prevent this, it’s advisable to closely follow Google’s guidelines to ensure your store’s compliance. Understanding and adhering to these policies is crucial for successfully managing a Google Shopping setup.
Regardless of whether your operations are local or nationwide, navigating the approval process is key. With a well-crafted feed, it’s possible to achieve cost-effective clicks and conversions, reduce advertising costs, and maintain profitable rankings.
Contact Me


